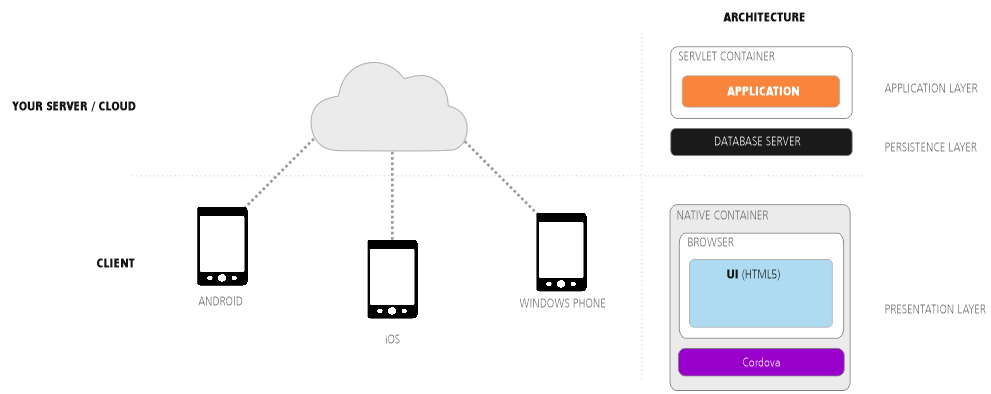
Mit RapidClipse können Sie Ihr Projekt als hybride Mobile App für Android und iOS deployen. Der Deployment-Assistent erzeugt für die jeweilige Zielplattform eine ausführbare Datei (APK für Android, IPA für iOS), die Sie in den jeweiligen App-Stores hochladen können. Android-Apps lassen sich auch direkt auf dem Zielgerät installieren. Hybride Apps bestehen aus einer sehr schlanken nativen App, die fest auf dem mobilen Gerät installiert wird. Die Anwendung selbst ist eine Java Anwendung die auf dem Server läuft (Servlet). Die HTML-Oberfläche wird dynamisch vom Server erzeugt und mit Hilfe des jeweiligen System-Browsers angezeigt wird, der innerhalb der App im Vollbild-Modus läuft. Der Browser ist damit nicht erkennbar.
XDEV Mobile-Kit einbinden
Um Mobile Apps deployen zu können, benötigen Sie das XDEV Mobile-Kit, das Sie auch nachträglich einbinden können.
...
With RapidClipse, you can deploy your project as a hybrid mobile app for Android and iOS. The deployment assistant generates an executable file for each target platform (APK for Android, IPA for iOS) and you can then upload this to the respective app stores. You can even install Android apps directly on the target device. The hybrid mobile app consists of a really sleek native app that is permanently installed on the mobile device. The application itself is a Java application that runs on the server (Servlet). The HTML user interface is dynamically generated by the server and is displayed on the client with the help of the respective system browser, which runs full-screen in the app. Thus, the browser is not recognizable.
Embed XDEV Mobile Kit
To deploy mobile apps, you need the XDEV Mobile Kit. You can embed apps during the process of creating a RapidClipse project. Alternatively, you can also embed the mobile kit at a later date.
- Embed Mobile Kit during the creation of a RapidClipse project
- Embed Mobile Kit at a later date
- In Project Management, right-click on the name of your project. In the context menu, select XDEV MobileKit > Add XDEV MobileKit to Project.
- Legen Sie im folgenden Editor die Einstellungen für die Konfigurations-Datei In the following editor, configure the settings for the configuration file: mobile.xml > Settings fest.
Configure Mobile App
...
settings
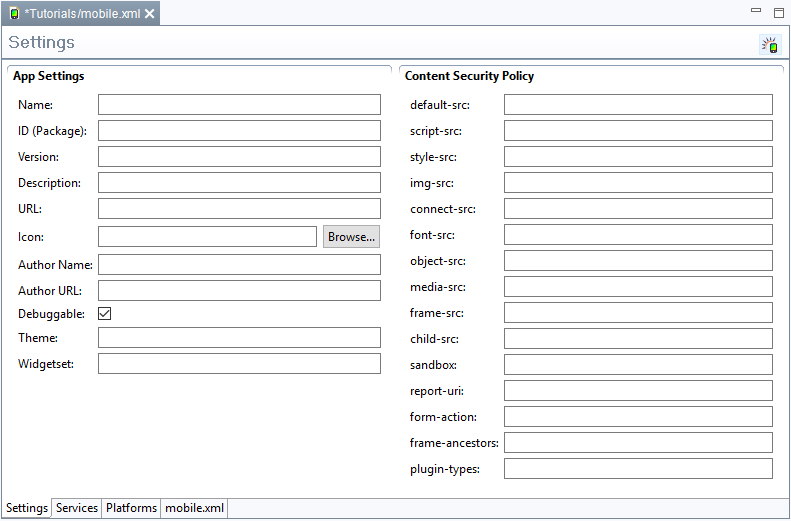
You will find the Mobile App Einstellungen befinden sich in der Datei settings in the mobile.xml. Klicken Sie diese an, um die Mobile App Einstellungen zu öffnen. file. Click the file to open the Mobile App settings.
...
Options:
- App Settings
- Name- Name der App. Wird als Bezeichnung für die generierte App und als Dateinamen der App verwendet. Wenn dieser Wert nicht gesetzt ist wird der Wert des <name>-Attributs aus der pom.xml übernommen (meist der Projektname: Name of the app. This name is automatically assigned to the generated app and the app file. If this value is not set, the value of the <name> attribute is taken from the pom.xml file (usually the project name).
- ID (Package) - Die App-ID dient zur eindeutigen Identifizierung der App auf einem Gerät und in App-Stores. Wenn dieser Wert geändert wird, wird die App nicht als Version der ursprünglichen App erkannt, sondern als neue App behandelt. Eine bereits auf einem Device vorhandene App mit derselben ID wird beim installieren ersetzt. Wenn dieser Wert nicht gesetzt ist wird die ID aus der groupID und der artifactID der pom.xml generiert, z.B. : The app ID is used to clearly identify the app on a device and in app stores. If this value is changed, the app won’t be recognized as a version of the original app. Instead, it will be treated like a new app. Each version of an app with the same ID that exists on a device will be replaced during the installation. If this value is not set, the ID is generated from the groupID and the artifactID of the pom.xml file; e.g., "com.example.myproject."
- Version - Die Version der App. Wenn dieser Wert nicht gesetzt ist wird die Versionsnummer des Projekts übernommen (<version> Attribut der : Version of the app. If this value is not set, the number of the project version is applied (<version> attribute of the pom.xml).
- Description - Hier kann eine Beschreibung der App eingefügt werden: A description of the app.
- URL - Hier muss die URL eingetragen werden, unter der die zugehörige Anwendung erreichbar ist. Wenn dieser Wert nicht gesetzt ist wird das <url> Attribut der pom.xml verwendet.
- Icon - Hier kann das Icon einer App gesetzt werden. Es ist auch möglich, mehrere Größen des Icons anzugeben.
- Author Name - Hier kann der Name des Autors oder der Betreiberorganisation gesetzt werden. Wenn dieser Wert nicht gesetzt ist wird das <name> Attribut des <organisation> tags der pom.xml verwendet.
- Author URL - Hier kann die Website des Autors oder der Betreiberorganisation gesetzt werden. Wenn dieser Wert nicht gesetzt ist wird das <name> Attribut des <organisation> tags der pom.xml verwendet.
- Debuggable - Dieser Wert kann gesetzt werden um Debug-Funktionen der App zu aktivieren. Diese werden benötigt, wenn Tools wie z.B. PhoneGap eingesetzt werden
- Theme - Das Theme der App. Hier kann ein alternatives Theme gesetzt werden, um das Styling der App anzupassen. Standard ist das Project-Theme.
- Widgetset - Das Widgetset der App. Hier kann ein alternatives Widgetset gesetzt werden. Standard ist das Projekt-Widgetset.
- Content Security Policy
Die Content Security Policy (CSP) erlaubt es, die Standard-"Same-origin policy" anzupassen und zum Beispiel Quellen hinzuzufügen, von denen bestimmte Inhaltstypen nachgeladen werden dürfen.
Die Einstellungen der CSP, die "Direktiven", sind zumeist für bestimmte Inhaltstypen zuständig, die Direktive "style-src" beispielsweise für Stylesheets.
Der Wert jeder Direktive kann aus mehreren Parametern bestehen, die durch Leerzeichen getrennt sind, meist sind es Listen von erlaubten Quellen.
Eine Quelle kann eine vollständige URL, eine Domain oder auch nur ein URL-Schemata wie http: oder https: sein.
- default-src - Standardquellen für Inhalte. Gültig für alle Inhaltstypen, sofern der Wert der speziellen Direktive für diesen Inhaltstyp nicht gesetzt ist.
- script-src - Dieser Wert legt gültige Quellen für Javascript fest.
- style-src - Dieser Wert legt gültige Quellen für Stylesheets fest.
- img-src - "img-src" legt Quellen für Bilder und Favicons fest.
- connect-src - Ziele für Fetch, XMLHttpRequest, WebSocket und EventSource - Verbindungen
- font-src - Diese Direktive legt fest, von welchen Quellen Fonts geladen werden dürfen
- object-src - Hier kann festgelegt werden, von welchen Quellen Inhalte für <object>, <embed>, und <applet> Elemente geladen werden dürfen.
- media-src - "media-src" legt erlaubte Quellen für die Inhalte von <audio> und <video> Elementen fest
- frame-src - Hier werden gültige Quellen für die Inhalte von <frame> und <iframe> Elementen definiert. "frame-src" wird voraussichtlich von "child-src" abgelöst
- child-src - Auch "child-src" legt die Quellen für die Inhalte von <frame> und <iframe> Elementen fest.
- sandbox - Hier können Sandbox-Regeln analog zum sandbox-Attribut in HTML5 festgelegt werden
- report-uri - Hier kann eine URI eingetragen werden. Wenn dieser Wert gesetzt ist, werden Versuche, die CSP zu verletzen als JSON-Dokument per POST request and die angegebene URI gesendet.
- form-action - Dieser Wert legt gültige Ziele für <form>-Actions fest.
- frame-ancestors - Legt fest, wer diese Seite mittels <frame>, <iframe>, <object>, <embed> oder <applet> einbinden darf.
- plugin-types - Legt durch "MIME types" fest, welche Browserplugins aufgerufen werden dürfen.
App Funktionen definieren
- Klicken Sie auf den Ordner Services.
- Selektieren Sie in der folgenden Ansicht die App-Funktionen, mit der Sie Ihre App ausstatten möchten.
Ziel-Plattform definieren
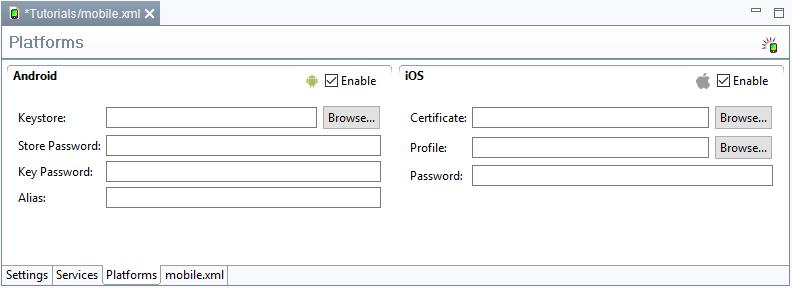
- Klicken Sie auf den Ordner Platforms.
- Selektieren Sie in der folgenden Ansicht die Zeil-Plattformen für die Sie eine App deployen möchten.
- Geben Sie in der folgenden Ansicht die benötigten Zugangsdaten ein.
Optionen:
- Android
- Keystore - Unter Android müssen Apps digital mit einem (Public-Key-)Zertifikat signiert werden, bevor sie installiert werden können. Hier müssen Sie einen Keystore angeben, der das Schlüsselpaar mit dem gewünschten Zertifikat enthält.
- Store Password - Das Passwort des Keystores.
- Key Password - Das Passwort für das Schlüsselpaar
- Alias - Der Aliasname, der das Schlüsselpaar und damit das Zertifikat im Keystore eindeutig identifiziert.
- iOS
- Certificate - Hier müssen Sie Ihr Apple Zertifikat angeben.
- Profile - Der Pfad zu Ihrer Apple-Profil-Datei.
- Password - Das Passwort für das Zertifikat
Um ein Apple-Zertifikat und eine Profil-Datei von Apple beziehen zu können, müssen Sie einen Apple Developer Account besitzen.
App Build-Prozess starten
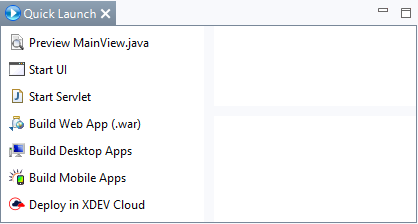
- Klicken Sie bei Quick Launch > Build Mobile Apps.
- Deployen Sie die in Ihrem Projekt unter target generierte .war Datei in Ihren Applicationserver.
- Deployen Sie die in Ihrem Projekt unter target > mobile-apps generierte Mobile Anwendung (.apk für Android .ipa für iOS).
Ergebnis:
- Web-Anwendung - Im Project Management wird ein neuer Ordner target angelegt. Die ausführbare Web-Anwendung wird als .WAR Datei im Ordner target abgelegt.
- Mobile App - Im Project Management > target > mobile-apps wird die ausführbare Mobile App abgelegt (.apk für Android .ipa für iOS).
Android App deployen
Die generierte .apk Datei kann direkt auf Android Geräte kopiert sowie über gängige Android App-Stores ausgeliefert werden.
iOS App deployen
...
- : The URL of the corresponding application. If this value is not set, the value of the <name> attribute is taken from the pom.xml file.
- Icon: The icon for the app. You have the option to add icons of different sizes.
- Author Name: Name of the author or organization. If this value is not set, the <name> attribute of the <organization> tag from the pom.xml file is used.
- Author URL: Here, you can add a link to the author’s or organization’s website. If this value is not set, the <name> attribute of the <organization> tag from the pom.xml file is used.
- Debuggable: This value can be set to enable the debug features of the app. The debug features are needed for the use of tools, such as, for example, PhoneGap.
- Theme: Theme of the app. Here, you can style the app using an alternative theme. The project theme is applied as standard.
- Widgetset: Widget set of the app. Here, you can determine an alternative widget set. The default is the project widget set.
- Content Security Policy
The Content Security Policy (CSP) allows you to adapt the standard "same-origin policy” and to add sources from which certain types of content can be reloaded.
The settings of the CSP, the "directives," are typically responsible for certain types of content. For example, the directive "style-src” is responsible for stylesheets.
The value of each directive can consist of several parameters, which are separated by spaces. These parameters typically consist of the lists of permitted sources. A source can be a full URL, a domain, or even a URL scheme such as http: or https:
- default-src: Default sources for content. Valid for all content types provided the value of the directive for this content type is not set.
- script-src: This value defines valid sources for JavaScript.
- style-src: This value defines valid sources for style sheets.
- img-src: "Img src" defines sources for images and favicons.
- connect-src: Targets for Fetch, XMLHttpRequest, WebSocket and EventSource connections.
- font-src: This directive defines the sources from which you can download fonts.
- object-src: This directive defines the sources from which the content of the <object>, <embed>, and <applet> elements can be loaded.
- media-src: Specifies the permitted sources from which the contents of the <audio> and <video> elements can be loaded.
- frame-src: This directive defines the valid sources for the content of the <frame> and <iframe> elements. "Frame-src" is expected to be replaced with "child-src."
- sandbox: Sandbox rules can be defined here analogously to the sandbox attribute in HTML5.
- report-uri: Here, you can enter a URI. If this value is set, all attempts to violate the CSP are sent as a JSON document via POST request to the specified URI.
- form-action: This value determines valid targets for <form> -actions.
- frame-ancestors: Determines who may include this page via <frame>, <iframe>, <object>, <embed> or <applet>.
- plugin-types: Uses “MIME types" to define which browser plugins can be invoked.
Define app functions
- Click the Services folder.
- In the following view, select the app features that you would like to use with your app.
Define a target platform
- Click the Platforms folder.
- In the following view, select the target platforms on which you want to deploy your app.
- In the following view, enter your username and password.
Options:
- Android
- Keystore - Android apps must be digitally signed with a (public key) certificate before they can be installed. Here, you can define a keystore that contains the key pair with the requested certificate.
- Store Password - Password of the keystore.
- Key Password - Password for the key pair
- Alias - Alias name that clearly identifies the key pair and, thus, the certificate in the keystore.
- iOS
- Certificate: Here, you must specify your Apple certificate.
- Profile: The path to your Apple profile file.
- Password: Password for the certificate.
To receive an Apple certificate and a profile file from Apple, you need an Apple Developer Account.
Getting started with the app building process
- Select Quick Launch > Build Web App (.war).
- Deploy the .war file generated in your project under target in your application server.
- Deploy the mobile application (.apk for Android .ipa for iOS) which has been generated in you project under target > mobile-apps.
Result:
- Web application: A new file target is created in Project Management. The executable web application is saved as a .WAR file in the target folder.
- Mobile App - The executable mobile app is saved in Project Management > target > mobile-apps (.apk for Android .ipa for iOS).
Deploy Android app
The generated .apk file can be copied directly to Android devices and delivered via common Android App Stores.
Deploy iOS app
The generated .ipa file can be delivered via the Apple Store.