To implement the authorization, you need three tables for managing users, roles, and rights in the database, each of which is connected to the others by an n:m relation. The wizard allows you to generate the appropriate entities. In addition, the entities are connected by mapping. This allows RapidClipse to handle entities and attributes of any name. If the default mapping does not match your data structure, you can define custom queries.
...
Required data structure in general
Users - Save username, password, and any additional user-specific information. The designations used in RapidClipse APIs are User and Subject.
Roles - Save the roles/groups to which a user can belong. The designations used in RapidClipse APIs are Roles, Usergroups, and Userroles.
Rights - Save rights that can have a role. Here, you can also save the states or conditions that must be met. The designations used in RapidClipse APIs are Permissions and Resources.
Data structure generated by RapidClipse
Entities
Entity Attribute Data type Explanation User username String Saves the username as a string. password byte[] Saves the password as a byte array, usually encrypted. roles Set / List List of all roles. Role name String Saves the name of the rolls as a string. resources Set / List List of all rights. childRoles Set / List List of all roles. parentRoles Set / List List of all roles. users Set / List List of all users. Resource name String Saves the name of the rights as a string.. roles Set / List List of all roles. Data Access
UserDAO
RoleDAO
ResourceDAO
Database tables (using the example of MySQL) - Database tables generated by the (Hibernate) entity export function.
Entity Data fields Data type Explanation USER USERNAME varchar(255) Saves user data, including username and password. password tinyblob ROLE NAME varchar(255) Saves all roles. RESOURCE NAME varchar(255) Saves all rights. ROLERESOURCENM ROLE varchar(255) Saves all role-right combinations. A role can have many rights, a right can occur in many roles. RESOURCE varchar(255) ROLEROLENM CHILDROLE varchar(255) Saves any role-role combination, thus allowing the nesting of roles. PARENTROLE varchar(255) USERROLENM USER varchar(255) Saves all user-role combinations. A user can have many roles, a role can be taken by many users. ROLE varchar(255)
Dealing with an existing USER table: If you have already developed a table for managing users, roles, and rights in your database, make sure there is an appropriate entity with corresponding DAO in Project Management in Entities or Data Access. If not, you can generate the missing entity and DAOs using the Create JPA entities from table import function. It is not a problem if the field and table names are different because mapping is performed later.
...
- Entity for rights already exists: Select your existing entity.
No Resource Entity available yet: Click New Entity... to create a new Resource entity, including ResourceDAO DAO. - Select the respective attribute for the user rights Mapping > Resource name.
- Click Next >.
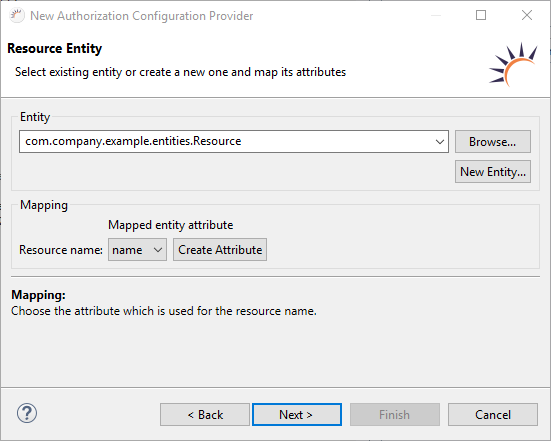
Options:
Resource name - Select the attribute to which the resource name is mapped for the user rights
Note:
Mapping - Once you have generated the Resource entity, you can apply the specified Resource.name attribute.
Result:
Project Management > Entities - The Resource.java entity class is generated or used by selecting an existing entity.
Entity Attributes Data type Resource name String Project Management > Data Access - The ResourceDAO.java DAO class is generated. When selecting existing entities no new DAO is generated.
...
- Table for roles (Roles) already exists - Select your existing Role entity.
No role entity exists yet - Click New Entity... to create a new Role entity including the RoleDAO. - Select the attribute for saving the roles under Mapping > Role name.
- Select the attribute for saving the rights under Mapping > Resources.
- Select the attribute for saving the sub roles in Mapping > Child roles.
- Click Next >.
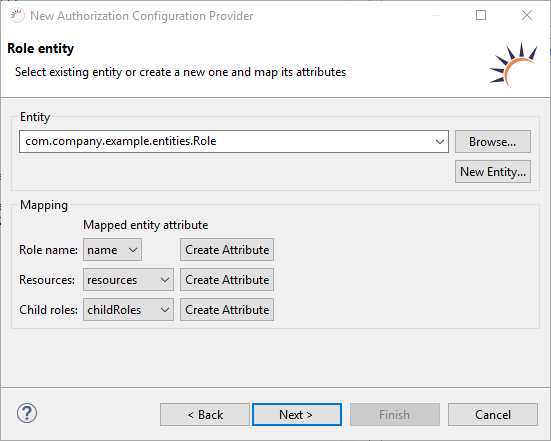
Options:
Role name - Auswahl des Attributs für die Bezeichnung der Rollen. Resources - Auswahl des Attributs mit der Liste Select an attribute for the role names.
Resources - Selection of the attribute with the list (Set / List) aller Rechte für eine Rolleof all rights for a role.
Child roles - Auswahl des Attributs mit der Liste Selection of the attribute with the list (Set / List) aller Unterrollen für eine Rolle.
...
of all sub-roles for a role.
Note:
Mapping - Wenn Sie das Entity Role generieren lassen, können Sie die vorgegebenen Attribute übernehmen.
...
If you generate the Role entity, you can apply the specified attributes.
Result:
Project Management > Entities
Role - Es wird die Entity-Klasse Role.java generiert oder durch Auswahl ein bereits existierendes Entity verwendet The entity class Role.java is generated or used by selecting an existing entity.
Entity AttributeDatentyp Data type Role name String resources Set / List childRoles Set / List parentRoles Set / List Resource - Die Entity-Klasse The Resource.java wird um das Attribut roles erweitert entity class is enhanced with the roles attribute.
Entity AttributeDatentyp Data type Resource name String roles Set / List
Project Management > Data Access - Es wird die DAO-Klasse It is the DAO class RoleDAO.java generiert. Bei Auswahl eines bereits existierenden Entities wird kein neues DAO generiert.
Verknüpfung von User und Roles
...
generated. When selecting an existing entity, no new DAO is generated.
Connecting Users and Roles
- Table for users (User) already exists - Select your already existing User entity.
No user entity exists yet - Click New Entity... to create a new users entity. - Select the attribute for the user name in Mapping > Subject name.
- Click Mapping > Roles and then click Create Attribute, to enhance the entity User with an attribute that connects the User and Roles attributes to each other.
- Click on Finish.
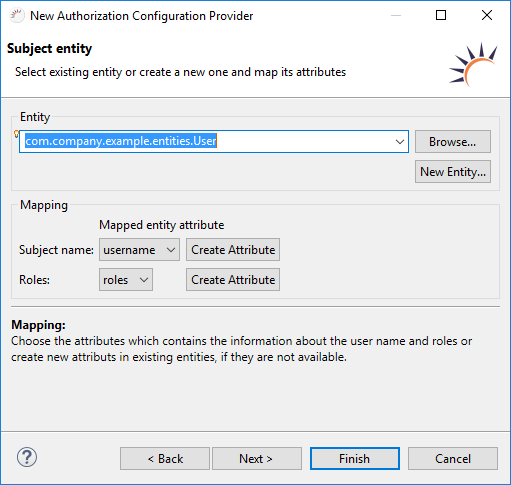
Optionen:
Subject name - Auswahl des Attributs für den Benutzernamen Select the attribute for the user name.
Roles - Auswahl des Attributs mit der Liste (Set/List) aller Rollen eines BenutzersSelect the attribute with the list of all roles for users.
Result:
Project Management > Entities
Role - Die Entity-Klasse The Role.java wird um das Attribut users erweitert. entity class is extended with the users attribute.
Entity AttributeDatentyp Data type Role name String resources Set / List childRoles Set / List parentRoles Set / List users Set / List User - Die Entity Klasse The User.java wird um das Attribut roles erweitert entity class is enhanced by the users attribute.
Entity AttributeDatentyp Data type User username String password byte[] roles Set / List
Project Management > Data Access - Es wird die DAO-Klasse The RoleDAO.java generiert. Bei Auswahl eines bereits existierenden Entities wird kein neues DAO generiert. DAO class is generated. When selecting an existing entity, no new DAO is generated.
Project Management > Business Objects - Es wird die Klasse The ExampleAuthorizationProvider.java generiert class is generated.
Code Block language java theme Confluence package com.company.example.business; import com.company.example.entities.Resource; import com.company.example.entities.Role; import com.company.example.entities.User; import com.xdev.security.authorization.AuthorizationConfiguration; import com.xdev.security.authorization.AuthorizationConfigurationProvider; import com.xdev.security.authorization.jpa.JPAAuthorizationConfigurationProvider; public class ExampleAuthorizationConfigurationProvider implements AuthorizationConfigurationProvider { private static ExampleAuthorizationConfigurationProvider INSTANCE; public static ExampleAuthorizationConfigurationProvider getInstance() { if (INSTANCE == null) { INSTANCE = new ExampleAuthorizationConfigurationProvider(); } return INSTANCE; } private JPAAuthorizationConfigurationProvider provider; private ExampleAuthorizationConfigurationProvider() { } @Override public AuthorizationConfiguration provideConfiguration() { if (this.provider == null) { this.provider = new JPAAuthorizationConfigurationProvider(User.class, Role.class, Resource.class); } return this.provider.provideConfiguration(); } }
Datenbanktabellen anlegen
...
Create database tables
It is necessary to create appropriate tables in the database that match the newly generated User, Role und Resource müssen entsprechende Tabellen in der Datenbank angelegt werden and Resource entities in the database.
Entity > Datenbank Database Export (Create tables)
Default-Daten eingeben
...
Enter default data
For database tables, it is helpful to enter some default data in the User, Role, and Resource entities.