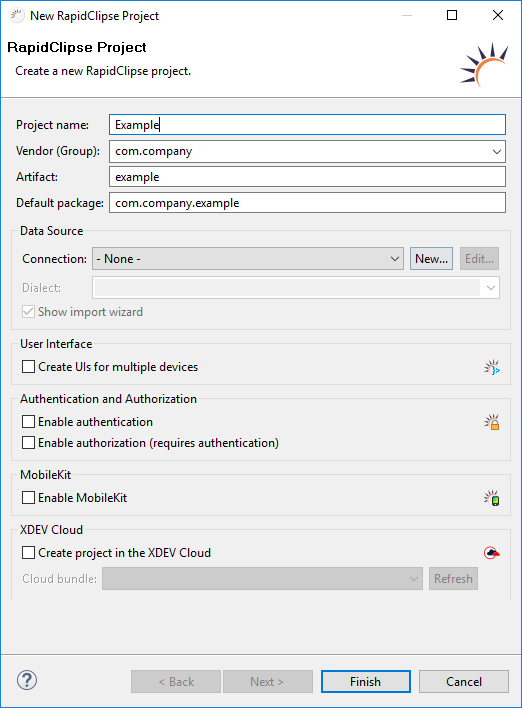
Create New Project
- In the menu, select File > New > RapidClipse Project.
In the following project wizard, enter the name of your project under Project name, e.g. Example.
Under Data Source > Connection, select a data source or click New... to create a new data source.
Click Finish.
Note:
The first time you create a new RapidClipse project, all libraries required for a RapidClipse project, along with their dependencies, will be automatically downloaded from the Maven Central Repository. This is why you have to be online. Depending on your Internet connection, the download can take a few minutes. After that, you can also work with RapidClipse offline.
Options:
- Data Source - Enables you to select an already existing data source and to create a new one.
- Show import wizard - Shows the database import wizard that imports the metadata in your database and generates appropriate entities.
- User Interface
- Create UIs for multiple devices - Generates a RapidClipse multiple UI project with different MainUIs, including the respective first view (MainView) for desktops, smartphones, and tablets.
- Authentication and Authorization
- Enable authentication - Standard concept for authentication. Creates a new authentication provider.
- Enable authorization - Standard concept for authorization. Creates a new authorization provider. To use the authorization option, make sure to also select Enable authentication.
- MobileKit
- Enable MobileKit - Connects the XDEV Mobile Kit. Gives you access to device and system functions of mobile devices and can deploy hybrid mobile apps for Android, iOS and Windows devices.
- XDEV Cloud
- Create project in the XDEV Cloud - Creates an XDEV Cloud project. You'll first need an XDEV Cloud account.
Result:
The wizard automatically downloads all the libraries with their dependencies, that are required for a RapidClipse project via Maven and creates a RapidClipse project with an empty MainUI and a first view (MainView).
MainUI.java
package com.company.example.ui;

import com.vaadin.annotations.Push;
import com.vaadin.annotations.Theme;
import com.vaadin.navigator.ViewDisplay;
import com.vaadin.server.VaadinRequest;
import com.xdev.ui.XdevUI;
import com.xdev.ui.navigation.XdevNavigator;


@Push
@Theme("Example")
public class MainUI extends XdevUI {
	public MainUI() {
		super();
	}

	/**
	 * {@inheritDoc}
	 */
	@Override
	public void init(VaadinRequest request) {
		this.initUI();
	}

	String username = "";


	/*
	 * WARNING: Do NOT edit!<br>The content of this method is always regenerated
	 * by the UI designer.
	 */
	// <generated-code name="initUI">
	private void initUI() {
		this.navigator = new XdevNavigator(this, (ViewDisplay) null);

		this.navigator.addView("", MainView.class);

		this.setSizeFull();
	} // </generated-code>

	// <generated-code name="variables">
	private XdevNavigator navigator; // </generated-code>

}
MainView.java - View created by RapidClipse. The name, MainView, can be changed at any time.
import com.xdev.ui.XdevView;

public class MainView extends XdevView {

/**
 *
 */
public MainView() {
	super();
	this.initUI();
}

/*
 * WARNING: Do NOT edit!<br>The content of this method is always regenerated
 * by the UI designer.
 */
// <generated-code name="initUI">
private void initUI() {
	this.gridLayout = new XdevGridLayout();

	this.gridLayout.setSizeFull();
	this.setContent(this.gridLayout);
	this.setSizeFull();
} // </generated-code>

// <generated-code name="variables">
private XdevGridLayout gridLayout; // </generated-code>


}
Servlet.java - Starts the application (Servlet) in the Servlet container.
package com.company.example.ui;

import javax.servlet.annotation.WebServlet;
import com.vaadin.annotations.VaadinServletConfiguration;
import com.xdev.communication.XdevServlet;

@WebServlet(value = "/*", asyncSupported = true)
@VaadinServletConfiguration(productionMode = false, ui = MainUI.class)
public class Servlet extends XdevServlet {
	public Servlet() {
		super();
	}
}
Related content
XDEV Software Corp. - One Embarcadero Center, San Francisco, CA 94111, US
Copyright © 2015. XDEV Software Corp. All rights reserved.

