/
Create an XDEV Cloud Project
Create an XDEV Cloud Project
- Copy Page Tree
- RapidClipse Translator Services
Owned by Copy Page Tree
Beim Anlegen eines XDEV Cloud Projekts wird das neue, lokale Projekt in die XDEV Cloud übertragen.
- In the menu, select File > New > RapidClipse Project.
- In the following project wizard, enter the name of your project in Project name , e.g. Example.
- In Data Source > Connection , select a cloud data source or click New... > XDEV Cloud Database to create a new cloud database.
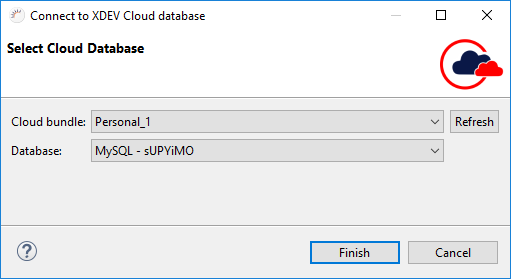
- In the following dialog, select your Cloud package under Cloud bundle and your cloud database under Database and click Finish.
- Select XDEV Cloud > Create project in the XDEV Cloud.
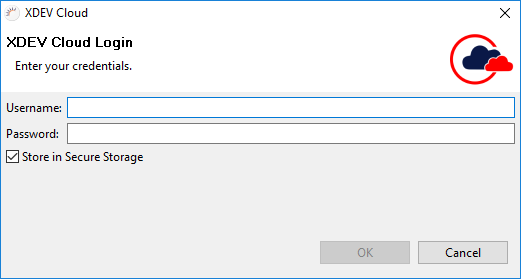
- When first accessing the XDEV Cloud, enter your username and password in the following dialog and click OK.
If you have your data saved in the Eclipse Secure Storage Backup, just select your cloud package under Cloud bundle . - Click on Finish
Result:
- GIT Repository
- Local: A new Git repository is created on your local computer.
- In XDEV Cloud: A new Git repository is created in XDEV Cloud.
- Commit: The first commit is performed automatically, and changes to your local Git repository will be applied in your XDEV Cloud Git repository.
- Database: Establishes a connection to your cloud database.
- XDEV Cloud project: If the cloud project was successfully created, a small XDEV Cloud icon appears in the Project Management area next to the project name.

Note:
- Secure Storage: You can store your data safely in Eclipse Secure Storage. If you use Secure Storage, a master password is generated that allows you to access your Secure Storage. To add a further level of security, you can create security questions for your master password and assign the respective answers.
, multiple selections available,
Related content
XDEV Cloud Deployment
XDEV Cloud Deployment
More like this
Synchronizing Changes to the Projects
Synchronizing Changes to the Projects
More like this
Opening the XDEV Cloud Manager
Opening the XDEV Cloud Manager
More like this
XDEV Cloud Projekt anlegen
XDEV Cloud Projekt anlegen
More like this
Create New Project
Create New Project
More like this
XDEV Cloud
XDEV Cloud
More like this
XDEV Software Corp. - One Embarcadero Center, San Francisco, CA 94111, US
Copyright © 2015. XDEV Software Corp. All rights reserved.